Apr 10, 2025
How to Recover Abandoned Carts on Shopify: Step-by-Step Guide for 2025
How to Recover Abandoned Carts on Shopify: Step-by-Step Guide for 2025
Shopify Apps
Boost Sales
You did everything right — someone found your store, fell in love with a product, added it to their cart…
…and then poof — they’re gone.
Sound familiar?
🔧 Step 1: Enable and Customize Shopify’s Abandoned Checkout Email
Shopify allows you to automatically send emails to customers who have abandoned their checkout. Here's how to set it up:
✅ How to Set It Up:
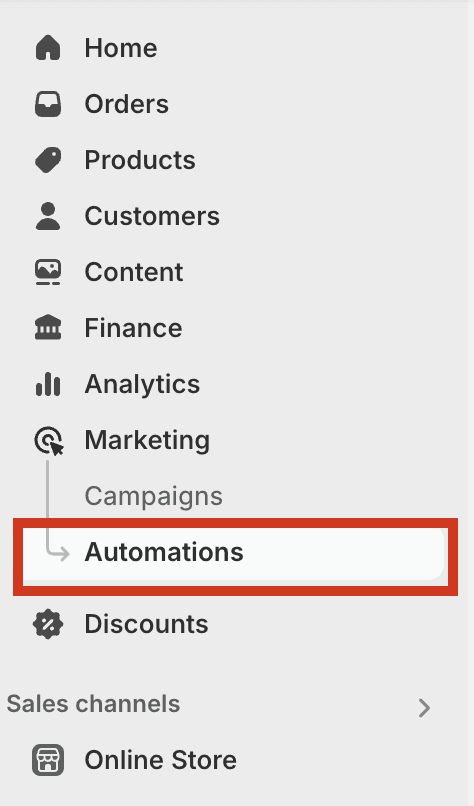
Access Marketing Automations:
From your Shopify admin, go to Marketing > Automations.
Create the Abandoned Checkout Automation:
Click on View templates, and then select the Abandoned checkout automation template.
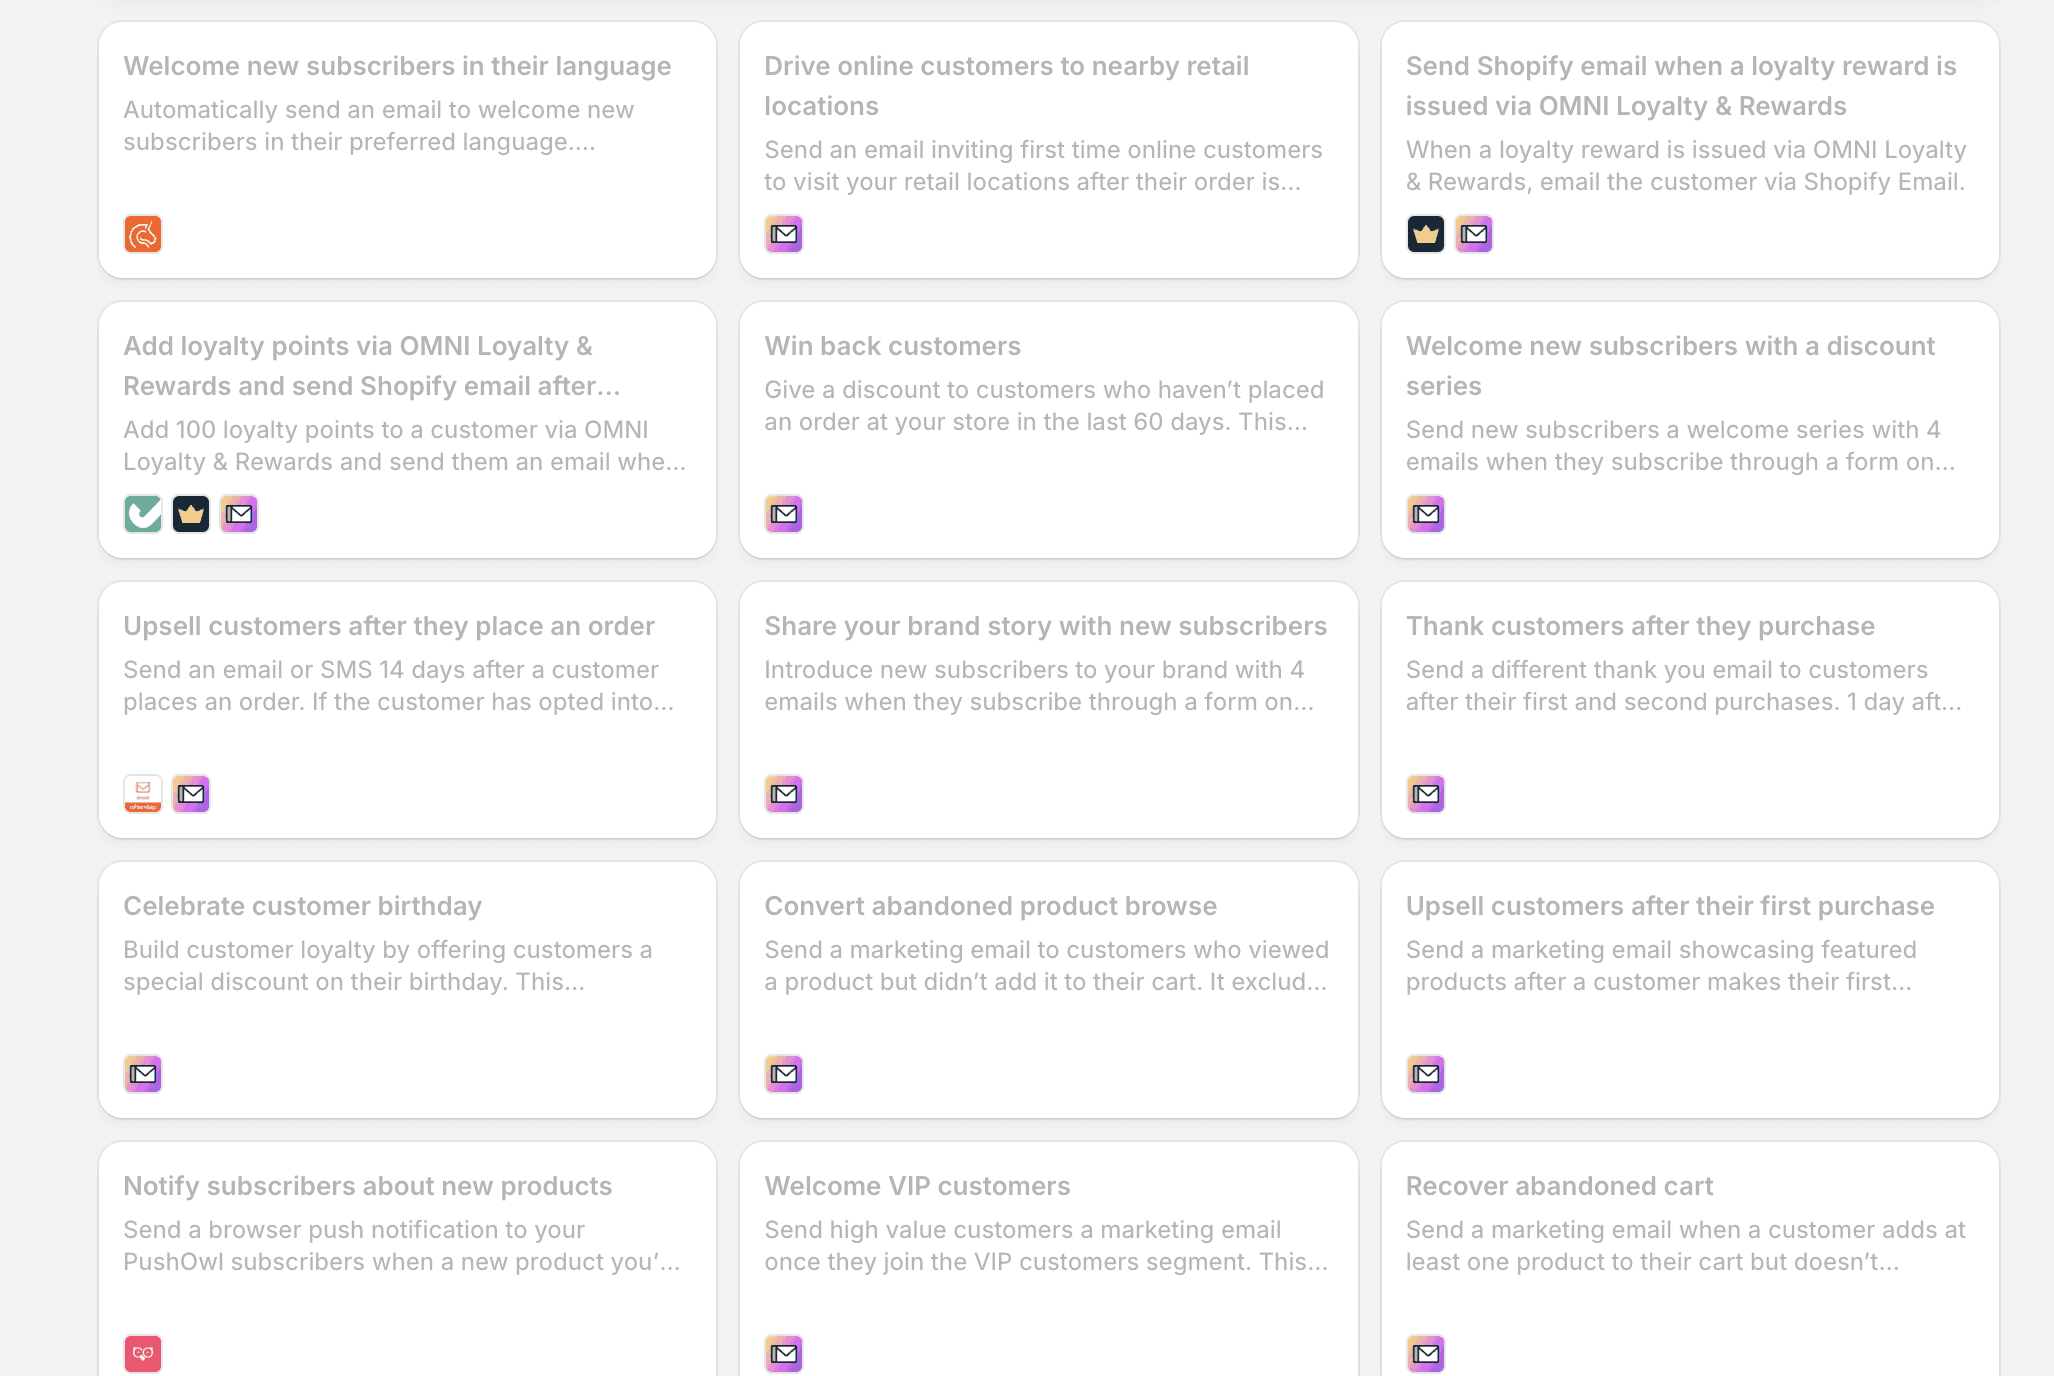
Click Turn on automation to activate it.
Customize the Email Content:
After activating, select the Abandoned checkout automation.
Click Edit > Edit email.
Modify the subject line, preview text, and body to align with your brand's voice. For example:
Subject: Oops, you left something behind!
Body:
Hey [First Name],We noticed you left [Product Name] in your cart. No worries—life gets busy!
If you're still interested, you can complete your purchase here:
👉 [Complete Your Purchase]
Need assistance? Just reply to this email—we're here to help!
Set the Timing and Recipients:
Determine when the email should be sent (e.g., 1 hour after abandonment).
Choose whether to send the email to all customers or only those who have subscribed to marketing emails.
Save and Activate the Automation:
After customizing, click Save.
Ensure the automation is turned on to start sending emails automatically.
Note: Activating this new automation is a permanent change. Once enabled, you cannot revert to the previous abandoned checkout email settings.
📩 Step 2: Implement a Follow-Up Email Sequence
Sending multiple follow-up emails can significantly increase the chances of recovering an abandoned cart. Here's how to set up a sequence:
🛠 Tools You Can Use:
✅ How to Set It Up:
Create a New Automation:
In your chosen email marketing tool, create a new automation or flow triggered by an abandoned checkout.
Design the Email Sequence:
Email 1: Send 1 hour after abandonment.
Subject: "Did something go wrong?"
Body: Friendly reminder about the abandoned item, offering assistance.
Email 2: Send 12 hours later.
Subject: "Here's 10% off to complete your purchase!"
Body: Offer a discount code to incentivize the purchase.
Email 3: Send 24 hours later.
Subject: "Last chance to grab your items!"
Body: Create urgency by indicating limited stock or time.
Activate the Automation:
Review and test each email to ensure proper formatting and functionality.
Activate the automation to start sending the sequence.
📱 Step 3: Utilize SMS Reminders
SMS reminders can be highly effective due to their immediacy. Here's how to implement them:
🛠 Tools You Can Use:
✅ How to Set It Up:
Install the SMS App:
Choose and install an SMS marketing app compatible with Shopify.
Collect SMS Consent:
Ensure you have explicit consent from customers to send SMS messages. This can be done by adding a checkbox at checkout for SMS marketing.
Create the SMS Automation:
Set up a new automation triggered by an abandoned checkout.
Craft a concise message:
"Hey [First Name], we noticed you left [Product Name] in your cart. Complete your purchase within the next hour and enjoy 10% off! Use code SAVE10 at checkout. [Link]"
Schedule the SMS:
Send the SMS within 1 hour of cart abandonment for optimal results.
Activate the Automation:
Test the SMS to ensure proper delivery and formatting.
Activate the automation to start sending messages.
Note: Always comply with local regulations regarding SMS marketing and ensure customers have opted in.
📣 Step 4: Set Up Retargeting Ads
Retargeting ads are a great way to reach potential customers who didn't leave any contact info — especially those who visited your product or cart page and left without purchasing.
🛠 Tools You Can Use:
Shopify’s Facebook & Instagram integration
Google Ads with dynamic retargeting
AdRoll or RetargetApp for more automation
✅ How to Set It Up (Using Shopify’s Facebook Channel):
From your Shopify admin, go to Sales Channels > Facebook
Click Start setup and connect your Meta Business account
Make sure your product catalog is synced (this enables dynamic product ads)
Inside Meta Ads Manager, create a new campaign:
Choose the Sales objective
For the audience, select Website Visitors > Added to Cart but Not Purchased
Create a dynamic ad that automatically pulls in product images, names, and prices
Use simple, personal ad copy like:
“Still thinking about this? We saved your cart — it’s just a click away.”
You can also use Google Ads (via the Performance Max or Display campaigns) to show similar reminder ads across the web, YouTube, and Gmail.
💬 Step 5: Use Exit-Intent Popups to Capture Emails Before They Leave
Before someone leaves your site, try to capture their email — so you have a way to follow up if they abandon their cart later.
🛠 Tools You Can Use:
✅ How to Set It Up:
Install the popup app of your choice from the Shopify App Store
Create a new popup campaign with an exit-intent trigger
This means it only shows when someone moves to close the browser or navigate away
Offer something helpful in exchange for their email:
“Wait! Get 10% off your order — just drop your email below before you go.”
Make sure the collected emails get added to your email marketing platform (like Klaviyo or Omnisend) so you can trigger abandoned cart flows later.
Exit popups can be annoying — but when timed and worded well, they’re super effective.
🔒 Step 6: Build Trust on the Cart and Checkout Pages
Sometimes people don’t abandon because they’re unsure about the product — they just don’t fully trust the store yet.
You can ease their worries with simple trust-building tactics:
✅ What to Add:
Product reviews near the cart or checkout button
A visible money-back guarantee or easy return policy
Security badges for payment processors (e.g., Visa, Mastercard, PayPal, SSL Secure Checkout)
Highlight benefits like:
“Ships in 1–2 days”
“Free returns for 30 days”
“Trusted by 10,000+ happy customers”
The goal is to answer that silent “Hmm… is this store legit?” thought.
✅ Final Recap: Your Shopify Abandoned Cart Recovery Checklist
✅ Turn on and customize Shopify’s abandoned checkout automation
✅ Set up a 3-part email recovery flow using Klaviyo or Omnisend
✅ Use SMS reminders within 30–60 minutes of abandonment
✅ Launch retargeting ads on Facebook, Instagram, and Google
✅ Add an exit-intent popup to capture emails before people leave
✅ Boost trust at checkout with reviews, guarantees, and security indicators
💡 Final Thoughts
You don’t have to recover every abandoned cart to see real results. Even recovering 10–20% can lead to a noticeable jump in revenue — and the best part is, most of this can run in the background once you set it up.
Start with one step. Then build from there.
Latest Updates
(GQ® — 02)
©2025
Latest Updates
(GQ® — 02)
©2025


Apr 10, 2025
How to Recover Abandoned Carts on Shopify: Step-by-Step Guide for 2025
Shopify Apps
Boost Sales
You did everything right — someone found your store, fell in love with a product, added it to their cart…
…and then poof — they’re gone.
Sound familiar?
🔧 Step 1: Enable and Customize Shopify’s Abandoned Checkout Email
Shopify allows you to automatically send emails to customers who have abandoned their checkout. Here's how to set it up:
✅ How to Set It Up:
Access Marketing Automations:
From your Shopify admin, go to Marketing > Automations.
Create the Abandoned Checkout Automation:
Click on View templates, and then select the Abandoned checkout automation template.
Click Turn on automation to activate it.
Customize the Email Content:
After activating, select the Abandoned checkout automation.
Click Edit > Edit email.
Modify the subject line, preview text, and body to align with your brand's voice. For example:
Subject: Oops, you left something behind!
Body:
Hey [First Name],We noticed you left [Product Name] in your cart. No worries—life gets busy!
If you're still interested, you can complete your purchase here:
👉 [Complete Your Purchase]
Need assistance? Just reply to this email—we're here to help!
Set the Timing and Recipients:
Determine when the email should be sent (e.g., 1 hour after abandonment).
Choose whether to send the email to all customers or only those who have subscribed to marketing emails.
Save and Activate the Automation:
After customizing, click Save.
Ensure the automation is turned on to start sending emails automatically.
Note: Activating this new automation is a permanent change. Once enabled, you cannot revert to the previous abandoned checkout email settings.
📩 Step 2: Implement a Follow-Up Email Sequence
Sending multiple follow-up emails can significantly increase the chances of recovering an abandoned cart. Here's how to set up a sequence:
🛠 Tools You Can Use:
✅ How to Set It Up:
Create a New Automation:
In your chosen email marketing tool, create a new automation or flow triggered by an abandoned checkout.
Design the Email Sequence:
Email 1: Send 1 hour after abandonment.
Subject: "Did something go wrong?"
Body: Friendly reminder about the abandoned item, offering assistance.
Email 2: Send 12 hours later.
Subject: "Here's 10% off to complete your purchase!"
Body: Offer a discount code to incentivize the purchase.
Email 3: Send 24 hours later.
Subject: "Last chance to grab your items!"
Body: Create urgency by indicating limited stock or time.
Activate the Automation:
Review and test each email to ensure proper formatting and functionality.
Activate the automation to start sending the sequence.
📱 Step 3: Utilize SMS Reminders
SMS reminders can be highly effective due to their immediacy. Here's how to implement them:
🛠 Tools You Can Use:
✅ How to Set It Up:
Install the SMS App:
Choose and install an SMS marketing app compatible with Shopify.
Collect SMS Consent:
Ensure you have explicit consent from customers to send SMS messages. This can be done by adding a checkbox at checkout for SMS marketing.
Create the SMS Automation:
Set up a new automation triggered by an abandoned checkout.
Craft a concise message:
"Hey [First Name], we noticed you left [Product Name] in your cart. Complete your purchase within the next hour and enjoy 10% off! Use code SAVE10 at checkout. [Link]"
Schedule the SMS:
Send the SMS within 1 hour of cart abandonment for optimal results.
Activate the Automation:
Test the SMS to ensure proper delivery and formatting.
Activate the automation to start sending messages.
Note: Always comply with local regulations regarding SMS marketing and ensure customers have opted in.
📣 Step 4: Set Up Retargeting Ads
Retargeting ads are a great way to reach potential customers who didn't leave any contact info — especially those who visited your product or cart page and left without purchasing.
🛠 Tools You Can Use:
Shopify’s Facebook & Instagram integration
Google Ads with dynamic retargeting
AdRoll or RetargetApp for more automation
✅ How to Set It Up (Using Shopify’s Facebook Channel):
From your Shopify admin, go to Sales Channels > Facebook
Click Start setup and connect your Meta Business account
Make sure your product catalog is synced (this enables dynamic product ads)
Inside Meta Ads Manager, create a new campaign:
Choose the Sales objective
For the audience, select Website Visitors > Added to Cart but Not Purchased
Create a dynamic ad that automatically pulls in product images, names, and prices
Use simple, personal ad copy like:
“Still thinking about this? We saved your cart — it’s just a click away.”
You can also use Google Ads (via the Performance Max or Display campaigns) to show similar reminder ads across the web, YouTube, and Gmail.
💬 Step 5: Use Exit-Intent Popups to Capture Emails Before They Leave
Before someone leaves your site, try to capture their email — so you have a way to follow up if they abandon their cart later.
🛠 Tools You Can Use:
✅ How to Set It Up:
Install the popup app of your choice from the Shopify App Store
Create a new popup campaign with an exit-intent trigger
This means it only shows when someone moves to close the browser or navigate away
Offer something helpful in exchange for their email:
“Wait! Get 10% off your order — just drop your email below before you go.”
Make sure the collected emails get added to your email marketing platform (like Klaviyo or Omnisend) so you can trigger abandoned cart flows later.
Exit popups can be annoying — but when timed and worded well, they’re super effective.
🔒 Step 6: Build Trust on the Cart and Checkout Pages
Sometimes people don’t abandon because they’re unsure about the product — they just don’t fully trust the store yet.
You can ease their worries with simple trust-building tactics:
✅ What to Add:
Product reviews near the cart or checkout button
A visible money-back guarantee or easy return policy
Security badges for payment processors (e.g., Visa, Mastercard, PayPal, SSL Secure Checkout)
Highlight benefits like:
“Ships in 1–2 days”
“Free returns for 30 days”
“Trusted by 10,000+ happy customers”
The goal is to answer that silent “Hmm… is this store legit?” thought.
✅ Final Recap: Your Shopify Abandoned Cart Recovery Checklist
✅ Turn on and customize Shopify’s abandoned checkout automation
✅ Set up a 3-part email recovery flow using Klaviyo or Omnisend
✅ Use SMS reminders within 30–60 minutes of abandonment
✅ Launch retargeting ads on Facebook, Instagram, and Google
✅ Add an exit-intent popup to capture emails before people leave
✅ Boost trust at checkout with reviews, guarantees, and security indicators
💡 Final Thoughts
You don’t have to recover every abandoned cart to see real results. Even recovering 10–20% can lead to a noticeable jump in revenue — and the best part is, most of this can run in the background once you set it up.
Start with one step. Then build from there.